Welcome to my second post on Spring 5 Fundamentals, where I will be going through this Pluralsight course, Spring Framework: Spring 5 Fundamentals by Bryan Hansen. If you haven’t read my intro post to this series, click here.
Otherwise, let’s talk about Spring architecture and project setup!
Architecture
Let’s discuss why Spring was developed the way it was.
It was developed to make existing tasks easier. Before Spring, we used some design patterned from JEE blueprints to help establish better code and repeatable processes. They also helped establish a consistent way of doing things.
However, using JEE, we sometimes run into the problem of brittle and untestable code. For instance, we may need to recompile code because we were moving to a different environment, or change things like connection strings or URLs due to our environment. This problem is referred to as WORA (Write Once, Run Anywhere). We want to worry about the actual implementation and avoid hardcoding. This is what Spring tries to fix.
Prerequisites
Here are the tools we will need prior to working with Spring.
- Java 11 – the video uses this version of Java, but other versions may work fine
- Maven
- IDE – the video uses IntelliJ
- Tomcat – optional for most of this section
Java and an IDE will be the main things we need.
As for myself, I am using:
- IntelliJ IDEA 2022.2.3 (Community Edition)
- Java Version 8 Update 341 (the latest recommended for Mac at this time of writing)
Demo: Sample App Without Spring
Setup
The first step to creating an app is, of course, to set it up! The app we will be writing is a simple conference app with speakers. This is how I’ve set up my project.
- Name: conference
- Language: Java
- Build system: Maven
- JDK: openjdk-19
- GroupId: org.therenaissance (note: “org.the-renaissance” did not work because a hyphen in the package name confused the IDE, so I needed to remove it.)
- ArtifactId: conference
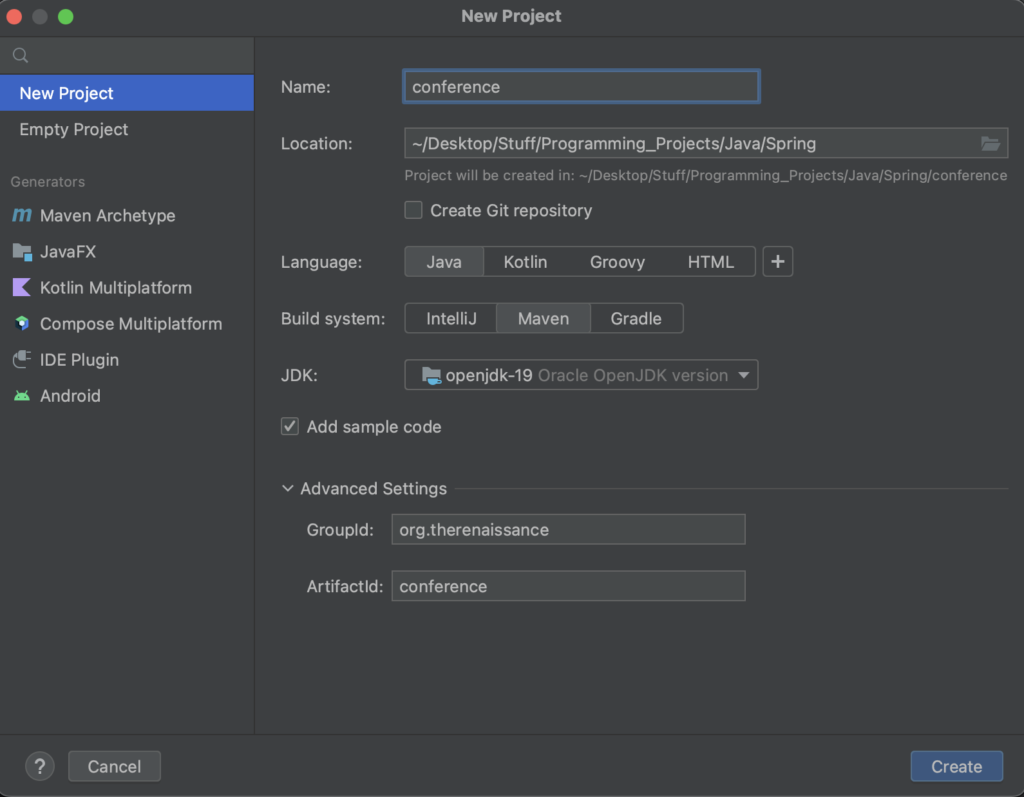
Once the project loads up, we are greeted by a pom xml file, which contains the following.
<?xml version="1.0" encoding="UTF-8"?>
<project xmlns="http://maven.apache.org/POM/4.0.0"
         xmlns:xsi="http://www.w3.org/2001/XMLSchema-instance"
         xsi:schemaLocation="http://maven.apache.org/POM/4.0.0 http://maven.apache.org/xsd/maven-4.0.0.xsd">
    <modelVersion>4.0.0</modelVersion>

    <groupId>org.therenaissance</groupId>
    <artifactId>conference</artifactId>
    <version>1.0-SNAPSHOT</version>

    <properties>
        <maven.compiler.source>19</maven.compiler.source>
        <maven.compiler.target>19</maven.compiler.target>
        <project.build.sourceEncoding>UTF-8</project.build.sourceEncoding>
    </properties>

</project>
We also have following Main java file.
package org.therenaissance;

public class Main {
	public static void main(String[] args) {
		System.out.println("Hello world!");
	}
}
Add Model
Let’s add a Speaker model to our project.
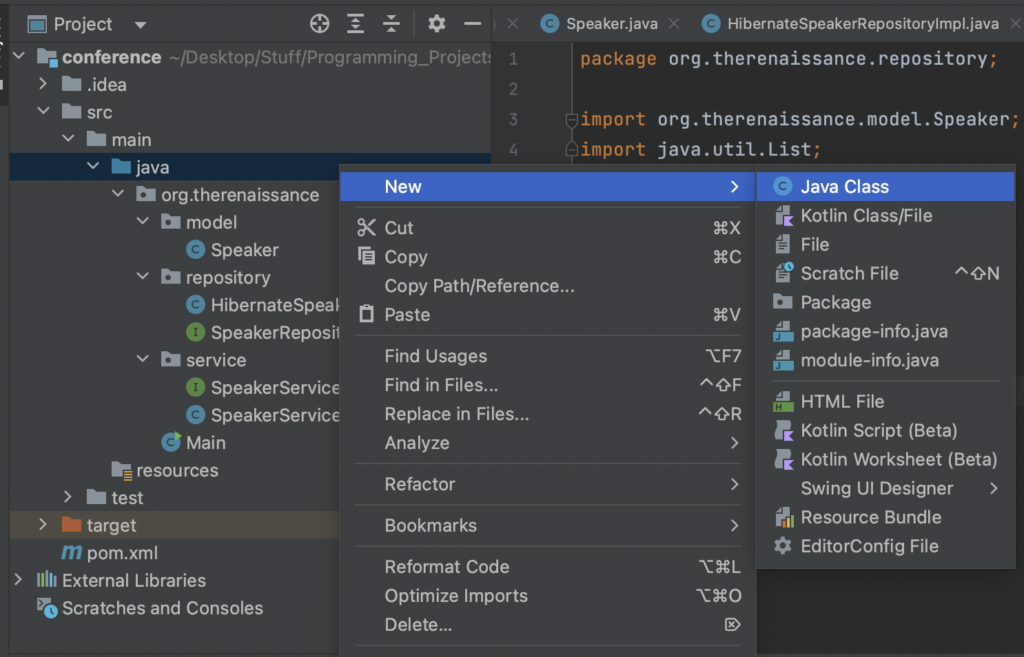
- Look at our Project Hierarchy
- Right-click on our package folder
- New > Java Class
- Name your class “model.Speaker” to create a new folder called “model” with a class called “Speaker”.
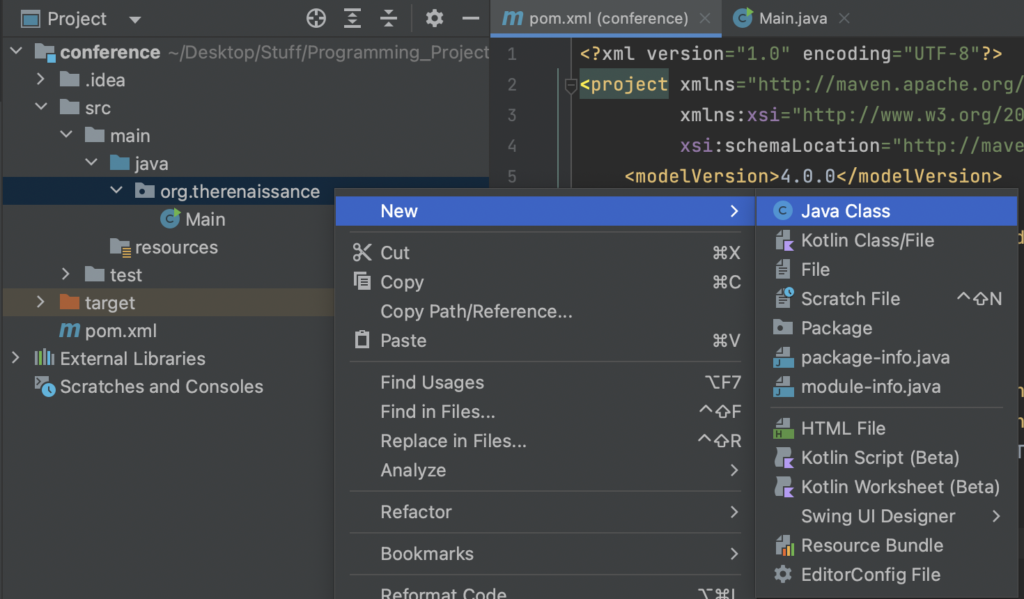
We will be met with an empty Speaker Java class file. Let’s add some attributes to our class.
package org.therenaissance.model;

public class Speaker {
	private String firstName;
	private String lastName;
}
Next, we want to add Getters and Setters so we can pull and modify the Speaker’s attributes while keeping its access at private. While we can do this by hand, IntelliJ gives us the option to generate this.
1. Give yourself some space by pressing enter twice.
2. Right-click on the line and select “Generate…”

3. Select “Getter and Setter”.

4. Highlight both attributes and press “OK”.
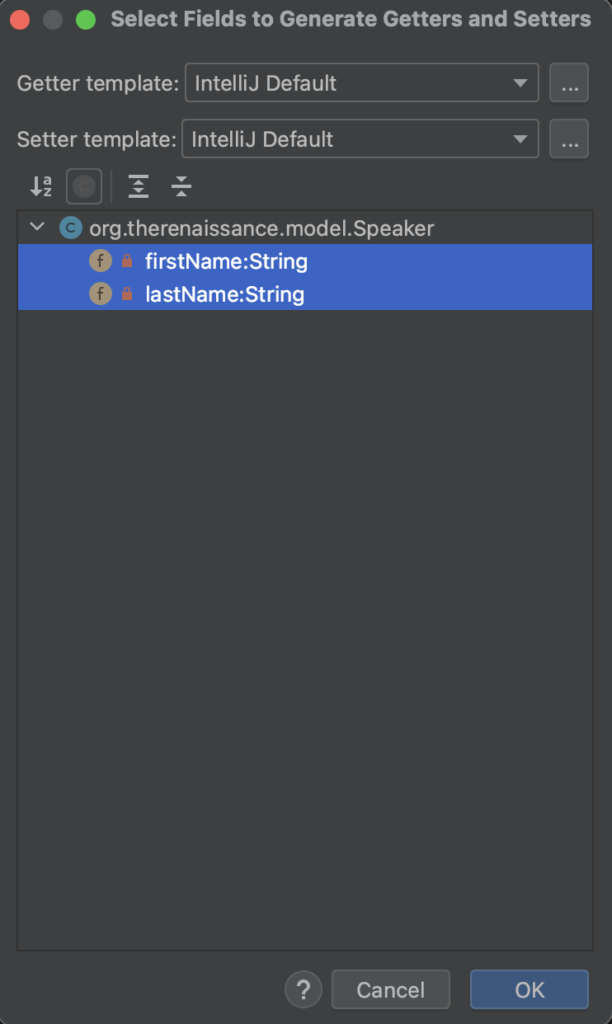
Voila! IntelliJ has saved you a minute of your life so you don’t have to type these out yourself. (Hey, these precious minutes add up.) Our class file now looks like this.
package org.therenaissance.model;

public class Speaker {
	private String firstName;
	private String lastName;

	public String getFirstName() {
		return firstName;
	}

	public void setFirstName(String firstName) {
		this.firstName = firstName;
	}

	public String getLastName() {
		return lastName;
	}

	public void setLastName(String lastName) {
		this.lastName = lastName;
	}
}
And there we go, we’ve added a model object to our code! Next, we’ll be adding a repository.
Add Repository
We can add a repository in the same way we added the previous model class. I’m not going to show you how to do it again because I’m assuming you’ve been paying attention. 😉
We want to add this repository object to our package folder, again as a new Java class. This time, let’s call it: repository.HibernateSpeakerRepositoryImpl
What a mouth-full. As you should know from before, this will create a folder called “repository” and with a Java class file called “HibernateSpeakerRepositoryImpl”.
While we normally wouldn’t want an implementation in its class name, we will be creating a Speaker Repository Interface through Spring which is all our app will care about.
Let’s enter the following into our class. You can read the comments to see what everything does. Note that if you don’t know what to import as you’re typing your code, IntelliJ will show the unimported code in red, and you can press Alt + Enter on the code to import IntelliJ’s suggestions.
package org.therenaissance.repository;

import org.therenaissance.model.Speaker;
import java.util.List;
import java.util.ArrayList;

public class HibernateSpeakerRepositoryImpl {

	// A function to find all Speakers
	public List<Speaker> findAll() {
		// Create a list of Speakers
		List<Speaker> speakers = new ArrayList<Speaker>();

		// Create an initial Speaker
		Speaker speaker = new Speaker();
		speaker.setFirstName("Dog");
		speaker.setLastName("Meat");

		// Add this speaker to the list
		speakers.add(speaker);

		// Return list of all speakers
		return speakers;
	}
}
Now, let’s extract an interface from this code. IntelliJ offers us a very easy way to do this.
1. Right-click in your class (when you do this, make sure to position the caret inside of the class, but not within a method).
2. Go to Refactor > Extract Interface
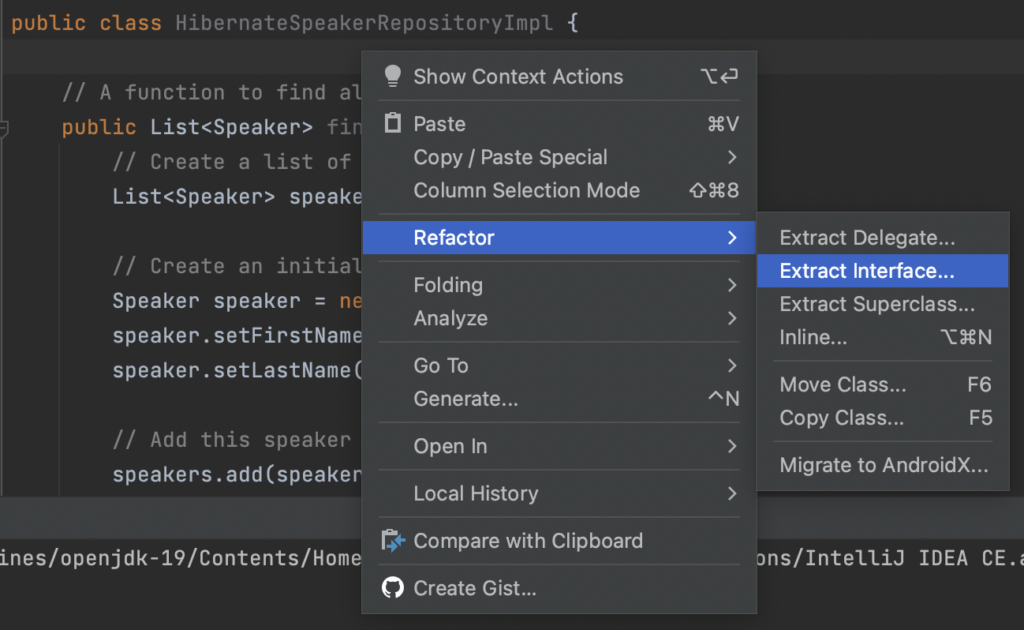
A dialogue box will appear.
3. Change the name of the interface to SpeakerRepository.
4. Check the findAll() method to extract the method name into the interface for us.

5. Press “Yes” and “OK” to the following dialog boxes that appear.
Let’s take a look at the changes refactoring the code has made. First off, in our HibernateSpeakerRepositoryImpl class, the following has been added:
public class HibernateSpeakerRepositoryImpl implements SpeakerRepositoryThere is also now an @Override header to our extracted method.
@Override
public List<Speaker> findAll()
Looking at our Project Hierarchy again, we can see we have a new interface file, SpeakerRepository, created under the current folder.
package org.therenaissance.repository;

import org.therenaissance.model.Speaker;
import java.util.List;

public interface SpeakerRepository {
	// A function to find all Speakers
	List<Speaker> findAll();
}
Now when we’re using this inside our code, we can refer to the methods by SpeakerRepository instead of HibernateSpeakerRepositoryImpl.
Add Service
The service tier, or the business logic tier, is the next piece we’re going to add to our application. You know the drill – right-click on your package folder and add another Java class. Call it: service.SpeakerServiceImpl
The next steps are similar to the previous steps. Note that we are doing this without Spring currently.
package org.therenaissance.service;

import org.therenaissance.model.Speaker;
import org.therenaissance.repository.HibernateSpeakerRepositoryImpl;
import org.therenaissance.repository.SpeakerRepository;
import java.util.List;

public class SpeakerServiceImpl {
	private SpeakerRepository repository = new HibernateSpeakerRepositoryImpl();

	public List<Speaker> findAll() {
		return repository.findAll();
	}
}
After filling this code, create an interface in the same way we created the previous interface. Name the interface SpeakerService and check off the only method in the box to extract it and continue as before. The following interface will be generated.
package org.therenaissance.repository;

import org.therenaissance.model.Speaker;
import java.util.List;

public interface SpeakerRepository {
	// A function to find all Speakers
	List<Speaker> findAll();
}
Run Application
Now we have everything we need to wire up our application.
This time, let’s create a Java class in our main java folder instead of our package folder and call it Application.
We will add a basic Java signature for a main method within it. Then we’ll add the following lines. The System.out.println line will be used to grab the first name of our first speaker at index 0, which we expect to be Dog in this case.
import org.therenaissance.service.SpeakerService;
import org.therenaissance.service.SpeakerServiceImpl;

public class Application {
	public static void main(String args[]) {
		SpeakerService service = new SpeakerServiceImpl();
		System.out.println(service.findAll().get(0).getFirstName());
	}
}
Run the application by right-clicking on the method and selecting Run ‘Application.main()’.
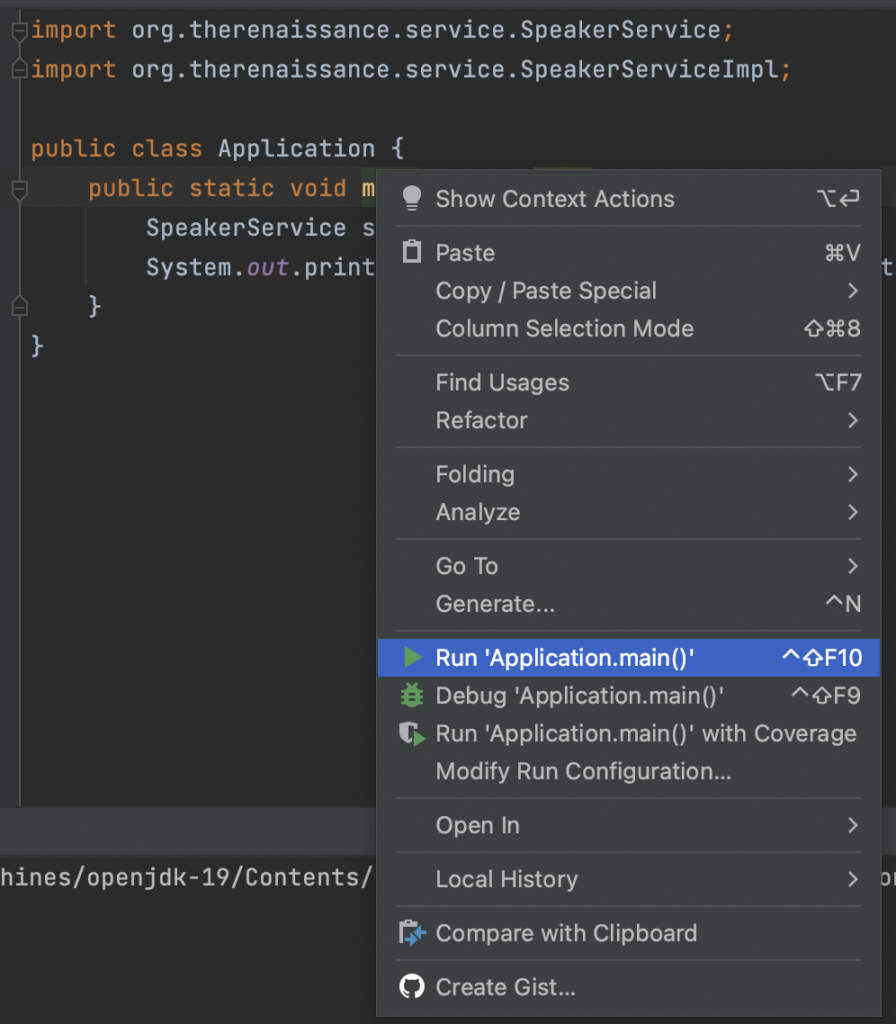
After it runs, what do we see in the console below?
Dog

Process finished with exit code 0
As expected! Congrats, you’ve got your application working. However, we did it without Spring. Later, we will explore what would change if we did it with Spring.
Configuration
Spring is about removing configuration code from your application. As we previously went over, we don’t like configuration code in our app because:
- It makes things brittle – in other words, it makes it hard to move to different environments.
- It makes it difficult to test – the testing isn’t hard; the configuration is as it makes code more complex.
We will see how to configure our application using:
- Java configuration in Spring approach
- Annotations in Spring
- XML configuration method
However, before we look at this, let’s take a closer look at our “pain points”.
Pain Points
In our Application class, check out this line:
SpeakerService service = new SpeakerServiceImpl();We can see that the our code uses the keyword new and references the SpeakerServiceImpl object, which has been hardcoded into it.
And in our SpeakerServiceImpl class, we see the same.
private SpeakerRepository repository = new HibernateSpeakerRepositoryImpl();If we ever wanted to change this, we’d have to rebuild our entire application based off this configuration. However, with Spring, we will be able to eliminate references such as these from our code.
Spring Download
Installing Spring into our project is simple. Go to your POM file and add the following. Replace the version with the current version of Spring Framework, which you can find here.
<dependencies>
    <dependency>
        <groupId>org.springframework</groupId>
        <artifactId>spring-context</artifactId>
        <version>5.3.23</version>
    </dependency>
</dependencies>
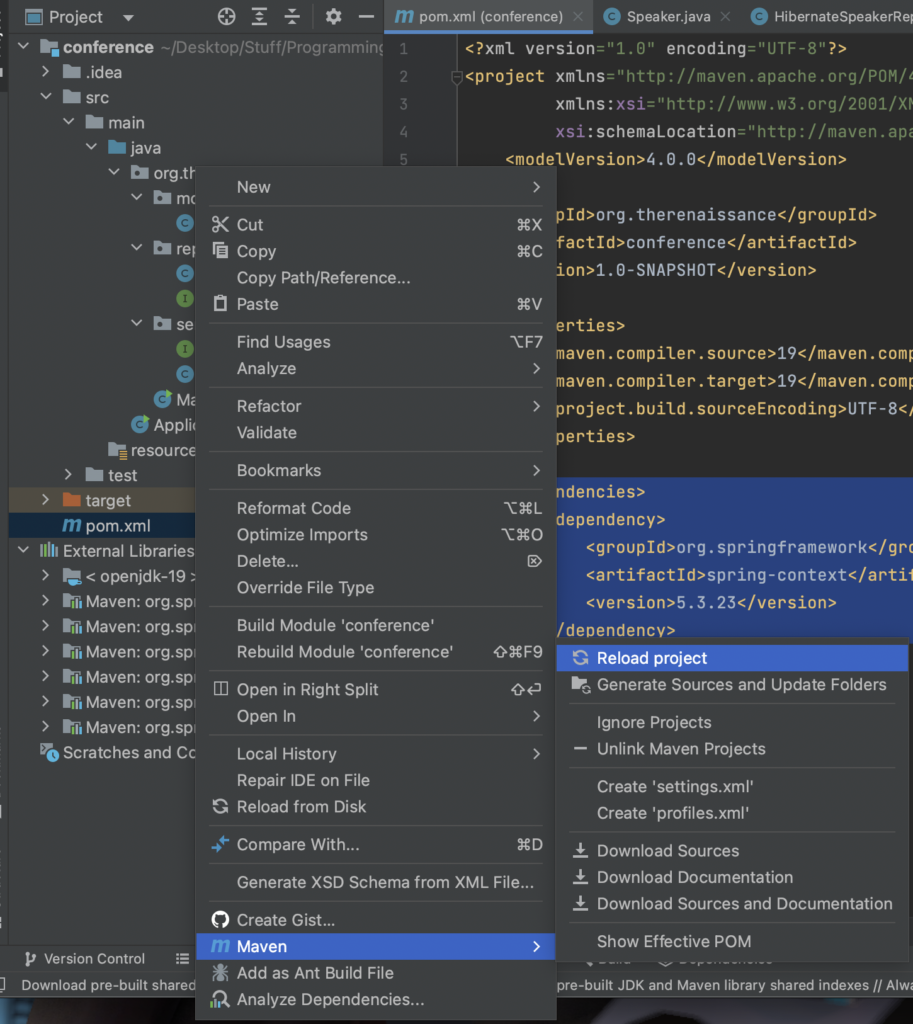
If you get a “dependency not found” error, look for the POM file in the hierarchy and go to Maven > Reload project. You’ll know that it worked when you see all of the Maven: org.springframework Spring libraries and their transitive dependencies (Spring AOP, beans, core, expressions, and JCL) have been imported into your project under External Libraries in the hierarchy.
Conclusion
Awesome! Now you’re all set up to use Spring. Let’s move on to the next section and actually use it, shall we?